How to Make Two Journals from One Composition Notebook
Today, I have a project for you that might make a nice gift (for you or someone else!) It’s an easy, altered composition notebook journal that’s fun and customizable. The bonus is, you will get two journals from just one composition notebook.

This post contains affiliate links, which means I will earn a commission if you purchase through them, at no additional cost to you.
How to Make Two Journals from One Composition Notebook
You know those composition notebooks that are everywhere at back to school time? (They usually have them at the dollar store too, but during back to school they are cheap at the discount stores.) You can even get them with graph paper (for bullet journaling or lettering practice.)
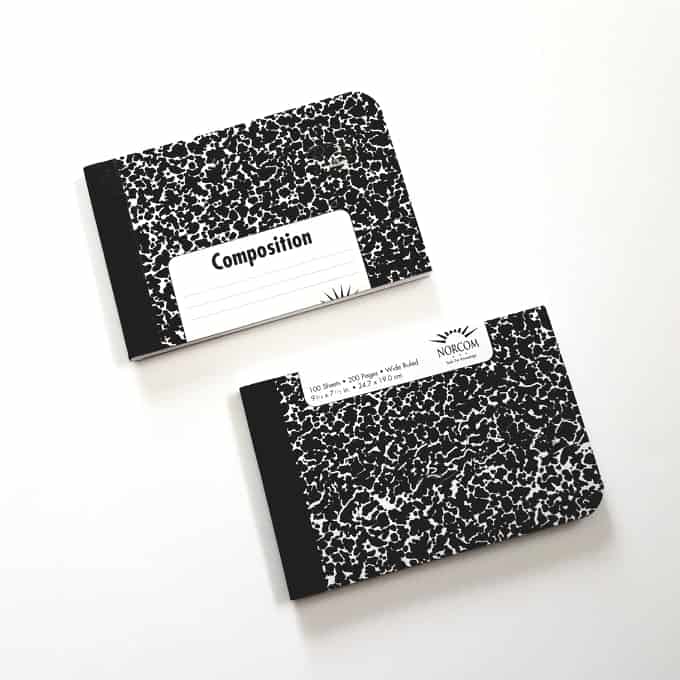
Years ago, I discovered that you can have them cut in half at most office supplies stores, for a small charge. You then have two notebooks for the price of one. Plus, they’re such a cute size.
When decorated, these make great gifts.
These would make fun planners, bullet journals, list books, recipe books, travel journals, baby journals, etc. (For example, you could use a vintage map or map scrapbook paper to make a travel journal, fun cooking related paper to make a recipe book, etc. Or use plain cardstock -kraft colored, black, white, etc.-, and stamp the designs, handletter, etc.)
This map themed journal would be great for a travel journal or everyday journal.

I think a teen or tween would enjoy this bright gratitude journal.

Supplies to make composition book journals:
- Composition Notebook
- Your choice of scrapbook paper or cardstock
- Paper Adhesive – You can use any good, non-wrinkling craft glue or paper adhesive. A favorite adhesive tool of mine is the Scotch ATG Adhesive applicator. (I believe you have to buy the tape separately.) The link is to the one I have, but I’m pretty sure there are other newer versions. It’s strong, and sticks firmly right away. So, be aware, it’s not very forgiving for moving the paper around! My favorite, strong way to adhere paper.
- Ribbon (optional)
- Craft glue or hot glue (for ribbon)
- Black ink (optional)
- Rubber stamps (optional)
- Scalloped Circle Punch outside (optional for decoration for floral journal)
- Scalloped Circle Punch inside (optional for decoration for floral journal)
Here’s how to make two journals from one composition notebook:
- Take your full size composition book to an office supply store. Ask them to cut it in half. (Your cut book will measure roughly about 7.5 inches wide by about 5 inches tall.)
- Measure the front cover of the book, and cut heavyweight pattern paper/cardstock to fit. Or do it the easy way, and just adhere the paper to the cover and then cut around the edge! Repeat for the back cover. For the tween journal, I covered the black binding with a coordinating paper, but it’s not necessary.
- For the tween journal, I punched both scalloped and regular circles and stamped my designs, before gluing them to the cover.
- To define the edges, I rubbed some black ink along them, which is personal preference of course!

Have fun with it, and I’d love to know how you would use your journal.
Pin for later!

This post was originally published in 2019 and updated in 2023.
Some of these products are similar, but not identical to, the ones I used:


Linking to:
Create with Joy, SITS Sharefest, Sew Can Do, Skip to My Lou, Gingersnap Crafts, Eye Love Knots, Shabby Art Boutique, Create with Joy, Imparting Grace, Esme Salon, Keeping it Real, My Random Musings, Lou Lou Girls, Home Matters, Keeping it Real, Tuesday Turn About, Wonderful Wednesday, Creatively Crafty, Wednesdays in the Studio, Thursday Favorite Things, French Ethereal, The Answer is Chocolate, The Cottage Market, Life and Linda, Random-osity, A Pinch of Joy, Try It Like It


Very cute idea!
Thank you, Michelle!
this is such a great idea, love it! xo
Thanks Katherine!
This is a fantastic idea, and so cute! I'm a teacher and we use interactive notebooks to take notes, but rarely seem to use a whole page- I might have to try this at school!
Thanks, Kelsey! That would be a great idea at school! My school journals always were about half a page full, now that you mention that!
This would make a great back to school gift for teachers! I love all the pretty colors! Thanks for sharing with us at the Snickerdoodle Link Party – this will be one of my features this Saturday at This Autoimmune Life!
That's a great idea, Roseann! Thanks so much for the feature!
Thank you for sharing at #OverTheMoon. Pinned and shared. Have a lovely week. I hope to see you at next week’s party too!
Such a cool idea, Pam! Love it!
Thanks, Carin! They are a lot of fun and so easy to create.
Great to "meet" you thanks for sharing on craft schooling Sunday!
Thank you for hosting, Sara!
What a cool idea!
Thank you for sharing with Creative Compulsions!
Michelle
https://mybijoulifeonline.com
Thanks, Michelle! They are fun to make!
Pam, what an awesome project!
Congrats on being a featured guest at our 500th Inspire Me Monday party at Create With Joy –
Come celebrate with us! 🙂
What a cute idea!! I wonder if my big paper cutter would cut it? It’s the heavy duty, guillotine type, you know the kind you can lose a finger with if not careful.
Thanks, Dee! I’ve never tried to cut them in half myself, but I imagine a really big cutter might work. Not sure!
What did the office supply store use?
I’m not sure! It was quick, though!
Ok, thanks!
What a great idea! I never thought of cutting a composition book in half.
Thanks, Donna! It makes such a cute size journal.
I love these journal ideas. Getting creative and making the journal your own will make it even more special. Great way to save some $$$. So glad I came across your post on SSPS #270!!
Thank you so much, Karen! I’m glad you like it!
Pam, what a clever idea! I love the size and how each is personalized. Amazing!
Mary, thanks so much! I love the size of them and how fun they are to make!
This is one of the coolest things I’ve ever seen! I had no idea they could cut a book in half like this. Thanks so much for the inspiration Pam, I love it!
Maria
I’m so glad it inspired you, Maria! I was so happy to stumble across this idea!
What an awesome idea to cut those kind of notebooks in half…. and then to turn them into cute journals is a cute idea, too! Thanks for sharing at the #HomeMattersParty.
Thanks so much Allyson!
What a clever idea xxx
Thank you, Dawn!
Question for anyone who has done this. I have the cutter so a friend asked me to cut them but I find no info on whether or not the stitch binding is compromised by this? It it not an issue or what do people do if it is?
Hi Ginger, I’ve not had a problem with the binding being compromised, when the book is cut. Mine were just traditional composition books, but the cutting didn’t affect the binding at all on mine. Hope this helps!
This is such a cool idea! You’ve decorated them beautifully, too. Visiting from the SSPS link party.
Thank you, Jennifer – I appreciate that!
Brilliant! What a great idea, and I love the different versions you made. Featuring when my link party opens.
Thank you so much, Carol! I really appreciate your kind words and the feature.