Make Marbled Paper with Shaving Cream
Today I want to show you a fun project made with shaving cream and paint. Have you ever heard of making marbled paper with shaving cream? This kind of paper marbling is so simple and fun for both adults and kids, and it only requires a few inexpensive supplies.
I love the versatility of this project because it can appeal to so many ages. As someone who loves paper crafts, journaling, etc., I’ve used this marbled cardstock for journal covers and tags.
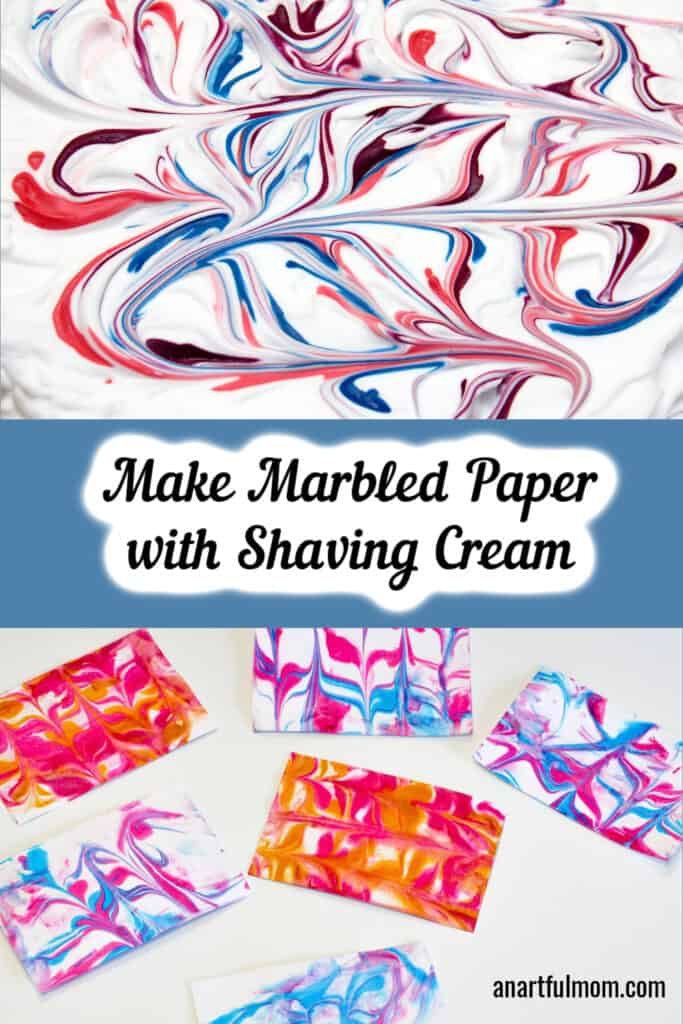
This is also really fun to do with kids. It’s simple, and the results are always so unique. I’ve made this several times, and each time the results have been very different.
This post contains affiliate links, which means I will earn a commission if you purchase through them, at no extra cost to you. As an Amazon associate, I earn from qualifying purchases.
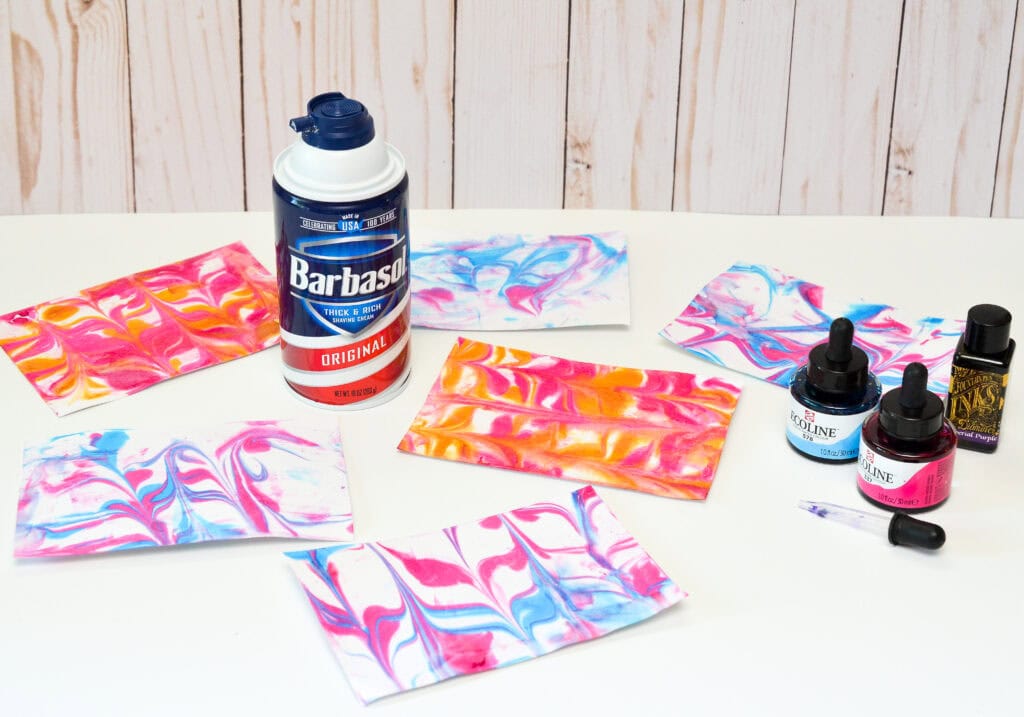
Supplies:
- Shaving cream (The cheap white kind works well, the more basic, the better. I used Barbisol original. Don’t use gel. )
- A pan or tray (I get some great plastic platters at Dollar Tree, or use a cookie sheet.)
- Liquid paint of some kind. I’ve used acrylic craft paint, liquid watercolors, and dye re-inkers. I’ve seen people use food coloring, too, which is convenient as you don’t need an eye dropper. True of some liquid watercolors, too.
- Cardstock (cut into manageable sizes for use on cards, journals, etc.) I used pre-cut 4×6 cardstock for some of mine. That’s a very easy size to work with.
- An old credit card or gift card, ruler or small squeegee
- A paintbrush, toothpick, or capped ballpoint pen
- Eye dropper (if you’re not using food coloring or a liquid watercolor that has its own dropper)
- Paper towels
- Wax paper or parchment paper

Here’s how to make marbled paper with shaving paper and paint:
- Spread the shaving cream in the tray, about a half inch or an inch deep, and smooth it out (a big enough section for your cardstock to fit on top)
- Drop a few drops of the paint or ink onto the shaving cream. I don’t use more than 3 colors at a time.

- With the toothpick, end of the paintbrush, capped ballpoint, etc., swirl through the paint drops to create the marbling. (Don’t spend too much time swirling, as the colors may become muddy.)

- Lay a piece of cardstock onto the shaving cream, and press it lightly into the shaving cream. (I cut cardstock pieces to about 4×6 or 5×7 inches, or use a heavy notecard.)
- Lift the cardstock and scrape the shaving cream off with the old credit card or a ruler. A little squeegee works great for this, but you don’t have to have one. Try to get as much of the shaving cream off as you can, with the card or squeegee.
- Set the piece aside to dry on some wax paper or parchment paper. After a little while, you can gently wipe off any remaining bits of shaving cream. Try not to wipe too much with the paper towel, as the colors can smear.
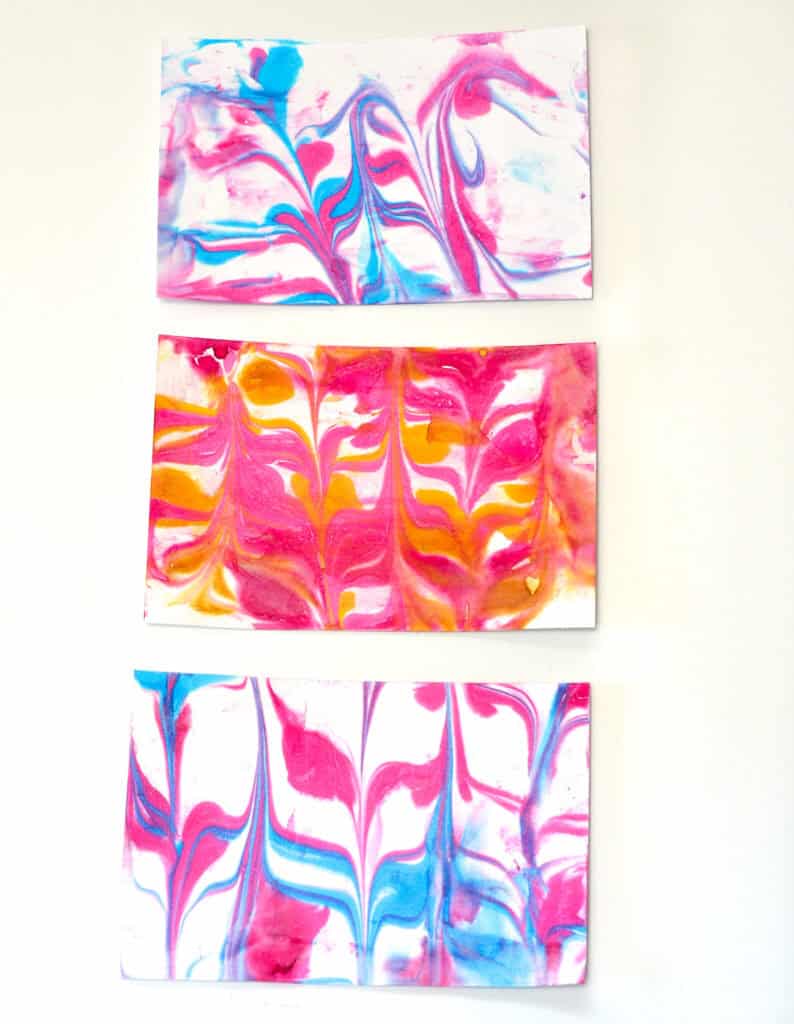
- You can repeat at least one or two more times, re-swirling the ink in between. The first piece you place on the shaving cream will have the most intense color.
Now you have some pretty, marbled cardstock that smells good too.

This project is messy, but being prepared with some pre-torn paper towels helps a lot! Also, have the wax paper or parchment paper laid out, ready to receive the cardstock.
Have fun!
This post was originally published in 2012 and updated in 2025.
Linking to:
Create with Joy, Creative Jewish Mom, Happiness is Homemade, Sum of Their Stories, Sew Can Do, Lou Lou Girls, Wonderful Wednesday, Shabby Art Boutique, Senior Salon Pit Stop, Mostly Blogging, Keeping it Real

I love this technique too.
This is so cool. This has been on my to do list for quite awhile but we haven't done it yet. We need to! Thanks!
My daughter will love this project! Thanks for showing us how! Looks like the beginnings of a fun summer afternoon.
That looks like a really fun project to do with my kids! Great gift idea too crafters!
What a fun project! What kid doesn't like to get a bit messy LOL? Thanks for sharing at the party this week! Have a wonderful weekend 🙂
That does look messy. The end result looks really great though.
what a fun project. The kids would love it! It looks pretty easy and the colors turn out lovely. Thanks for sharing!
I used to do this when I would do a lot of mail-in sweepstakes! I made postcards for the sweepstakes that required that you send in your entry via a postcard. 🙂 It just made entering sweepstakes that much more fun.
And I used food coloring.
Ahhhh! We do a version of this with Easter Eggs & whipped cream, but never thought of applying shaving cream to paper! Going to give this a try = love it! Found you at LeMoine Family Kitchen (stop by when you have a chance). :)!
Wow – that is so cool!!! What a fun idea for interesting paper to use for craft, I love it! 🙂 #HomeMattersParty
I want to hang out at your house. You do fun things! My kids would love to get messy with this craft.
Happy to be cohosting the #HomeMattersParty with you this week!
This looks like so much. And you can get messy and clean at the same time. Love this. Thanks for cohosting on the #homemattersparty
This looks like a fun craft to do with the kids. I know my kids would have a blast doing it.
Thank you for sharing this with us on the #HomeMattersParty.
I have been planning to try this technique with pencils to make marbled pencils. Looks so fun. I have some unopened alcohol inks, I think I can try them to make marbled cardstocks. #HomeMattersParty
I used to be a Stampin' Up demo so I love papercrafts too. I try to get my stuff out once a week and always wanted to try this technique. Thanks for inspiring me! #HomeMattersParty
This does look cool. I used to scrapbook so much before. Never thought to try this and make my own patterned paper. Thanks! #HomeMattersParty
Cute idea! I have never tried to make my own printed paper. I might have to give this a try!
How interesting, looks fun for the kids! Thanks so much for linking up with me at #AThemedLinkup 15 for Crafts and DIY, open April 15 to 25. All entries shared on social media if share buttons installed.
So cool! I’ve never seen this before! Such a good idea for kids and also memorable thank you notes maybe?
I love how they never come out the same way twice! We've tried this technique with paper, with our Easter Eggs, and even with coffee filters that we cut into shapes to decorate our windows with when my boys were young.
CONGRATS! Your post is FEATURED at #AThemedLinkup 16 for Gardening from my previous linkup for Crafts and DIY, open April 30 to May 10. All entries shared if social media buttons are installed.
This is such a neat idea. My daughter and son would love to do this with me. Thanks for sharing.
Thanks so much! I hope you give it a try. It’s so fun!
Looks like so much fun. Thanks for sharing at Handmade Monday, it’s one of the features this week 🙂
Thank you so much, Julie! I appreciate it!!
SO COOL!
Thanks, Michele! It’s so much fun to do.
Pan, I love the result you achieved with this fun technique.
Thank you for sharing your how to make marbled paper with shaving cream DIY at Create, Bake, Grow & Gather this week. I’m delighted to be featuring it at the party tonight and pinning too.
Hugs,
Kerryanne
Thank you so much for the feature, Kerryanne! I really appreciate it!!